VISIT 02 / 30 · ROUTINE B

Meet your second routine

25–35 minutes · Go at your own pace · A little practice, a little confidence

A THOUGHT TO TAKE WITH YOU

You’ll alternate two simple routines. Repeating exercises gives you a chance to learn them; you don’t need a new workout every time.

Make a little progress. Keep it.

Create a free plan to save your checklists and notes.

Save my progress ↗

Your visit, step by step 5 steps

STEP 01 · 5–10 minutes

An easy warm-up

Start at a pace you can chat through.

How to do it & alternatives

Walk on a treadmill or use a stationary bike at a comfortable pace. Ask staff to show you the controls and stop button before starting.

Need another option?

Walk around a clear, level area of the gym instead.

STEP 02 · 1 set · 8–10 reps

Seated leg curl

Let the machine support you.

Watch how to do it Video + 3-step guide
See the movement in action Demonstration by NASM Loads YouTube. Google receives connection data when you load the player. Privacy

Open original video ↗Video unavailable? Use this link or the guide below.

Ask staff to align the machine’s pivot with your knees and adjust both pads before you start.

Start → move → return

Seated leg curl — starting position
1. Set up

Sit back with thighs secured by the upper pad. Rest the lower leg pad just above your heels.

Seated leg curl — movement
2. Move

Bend your knees to bring your heels down and back. Keep your hips in the seat.

Seated leg curl — controlled return
3. Return slowly

Let your legs straighten slowly to the starting position without forcing the knees straight.

Simplified movement sketches. Your machine and comfortable range may differ; ask staff to check your setup.

Common mistakes to avoid

  • Lifting or shifting your hips to finish a repetition.
  • Letting the weight pull your legs back up suddenly.

Technique reference: NASM. Original sketches by Get Fit Planner. These sources have not reviewed or endorsed our program.

How to do it & alternatives

Have staff align the machine’s pivot with your knee and position the pads. Keep your back supported. Bend your knees smoothly against a light resistance, then return slowly.

Need another option?

Ask staff to show you a suitable hamstring machine. Skip this movement if you can’t get a comfortable setup.

Rest 60–90 seconds between sets, or longer if needed. Start light and stop before your technique changes.

STEP 03 · 1 set · 8–10 reps

Seated chest press

Back supported. Shoulders relaxed.

Watch how to do it Video + 3-step guide
See the movement in action Demonstration by NASM Loads YouTube. Google receives connection data when you load the player. Privacy

Open original video ↗Video unavailable? Use this link or the guide below.

Handle shapes and seat adjustments vary. Ask staff to help position the handles around chest height.

Start → move → return

Seated chest press — starting position
1. Set up

Plant your feet and support your back. Take the handles with wrists in line with your forearms.

Seated chest press — movement
2. Move

Press forward smoothly, breathing out. Keep shoulders relaxed and elbows slightly soft.

Seated chest press — controlled return
3. Return slowly

Let your elbows bend as you bring the handles back slowly to a comfortable starting position.

Simplified movement sketches. Your machine and comfortable range may differ; ask staff to check your setup.

Common mistakes to avoid

  • Pushing with a bounce or arching away from the backrest.
  • Letting wrists bend back or snapping elbows straight.

Technique reference: NASM. Original sketches by Get Fit Planner. These sources have not reviewed or endorsed our program.

How to do it & alternatives

Set the handles around chest height with staff help. Keep your feet grounded and back against the pad. Press forward smoothly, without locking your elbows, then return with control.

Need another option?

Wall push-up: place hands on a wall at chest height, step back a little, bend your elbows and gently push away.

Rest 60–90 seconds between sets, or longer if needed. Start light and stop before your technique changes.

STEP 04 · 1 set · 8–10 reps

Lat pulldown

In front of you. Never behind your neck.

Watch how to do it Video + 3-step guide
See the movement in action Demonstration by PureGym Loads YouTube. Google receives connection data when you load the player. Privacy

Open original video ↗Video unavailable? Use this link or the guide below.

Use a bar grip you can manage comfortably. Ask staff to secure the thigh pad and demonstrate getting into position.

Start → move → return
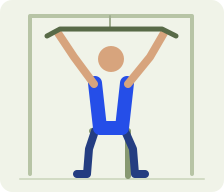
Lat pulldown — starting position
1. Set up

Sit with feet grounded and thighs under the pad. Hold the bar a little wider than your shoulders.
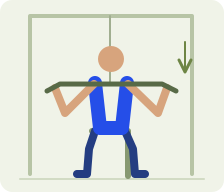
Lat pulldown — movement
2. Move

Bring the bar down in front toward your upper chest. Let your elbows travel down while keeping your torso steady.
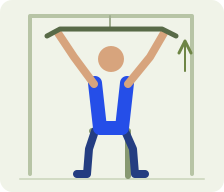
Lat pulldown — controlled return
3. Return slowly

Allow your arms to rise with control. Keep hold of the bar throughout the return.

Simplified movement sketches. Your machine and comfortable range may differ; ask staff to check your setup.

Common mistakes to avoid

  • Pulling the bar behind your neck.
  • Swinging your body or releasing the bar to let the weight drop.

Technique reference: PureGym. Original sketches by Get Fit Planner. These sources have not reviewed or endorsed our program.

How to do it & alternatives

Ask staff to set the thigh pad and demonstrate the grip. Sit tall. Bring the bar toward your upper chest without swinging or leaning far back, then let it rise slowly with control.

Need another option?

Use a seated row machine with a setup you know, or ask staff for a comfortable pulling alternative.

Rest 60–90 seconds between sets, or longer if needed. Start light and stop before your technique changes.

STEP 05 · 3–5 minutes

Ease out of your session

Slow down. Take a breath. You showed up.

How to do it & alternatives

Finish with a few minutes of easy walking. Put equipment back, wipe down what you used and take a moment to record how the visit felt.

Need another option?

Use any comfortable, gentle movement to wind down.

Machine settings, resistance used, how it felt, or anything you skipped. Keep sensitive health details out of your notes.

Checkmarks are not saved until you create a plan. Creating a plan starts a fresh checklist.